Do you have a project or web site that you need to get online quickly and easily? I was recently on-the-cheap and needed a fast, inexpensive way to host some static content on a custom domain while still providing access via HTTPS. This post describes one method of hosting such content using Azure Storage Accounts and Azure CDN. Not only does it provide one practical method for future projects, it is an opportunity to learn a bit more about integrating Azure services together for a product.
Scope
Using this walk-through you’ll be able to host a web page that:
- Serves static files such as text/html, images, and other downloadable files,
- Can include client-side scripts (no server-side scripting),
- Is accessible over HTTP and/or HTTPS,
- Can use a custom domain with a well-known CA-issued certificate,
- Utilizes a Content Delivery Network (CDN) for caching and fast client-side response,
- Utilizes Platform-as-a-Service cloud offering for low maintenance, and
- Is relatively low-cost (subject to amount of content stored and traffic served)
I’ll provide the basic set-up for a site served from Microsoft Azure Storage with static web site, then present optional add-ons that can extend the capability.
Note: I’m not covering ground-breaking material. This process is fully documented in several Microsoft Docs, starting with this one. All I’ve done is combine several of the processes into a walk-through.
Why
I used this method to quickly launch an initial event web site that required little maintenance and cost. In times past many of these actions seemed out of reach for individuals with small budgets. I wanted to show that it is now pretty easy to launch your own site, complete with custom certificate, without much cost or hassle. While I’m only showing an example here, the result can be extended to host real workloads such as your personal website or other projects that do not need an underlying run-time environment.
Example Site
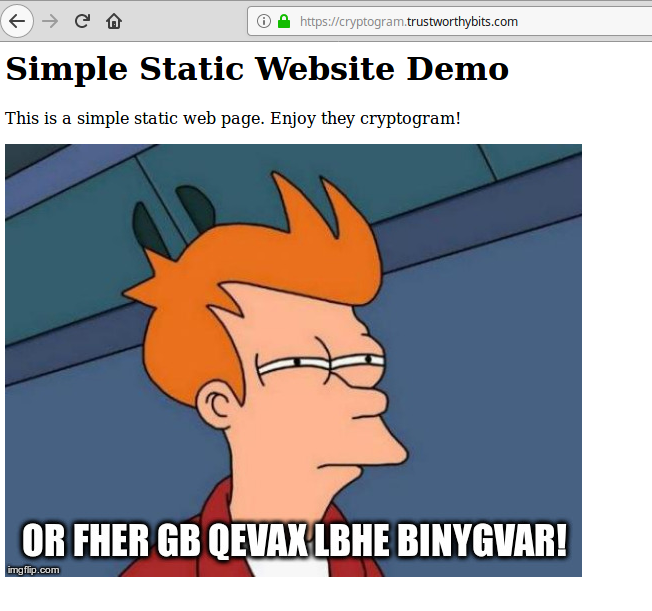
I’m going to build an example site called cryptogram that consists of some text and a cryptogram puzzle image. The full example will show how to host the site cryptogram.trustworthybits.com – a custom domain that I own. If you follow along, change instances of my hostname to a name that you prefer. If you attempt the full example you’ll need to use a domain that you own and for which you can manage DNS records.
Process
The initial steps are required and will give you a basic site capable of serving content via HTTP. The remaining steps are optional to provide extended capability such as custom domain with HTTPS.
Prerequisites
Some minimal prerequisites must be in-place prior to starting:
- Azure account
- Some initial web content – A simple HTML index page with an image is fine
Create Basic Environment
All Azure resources require a Resource Group. Create a Resource Group with a suitable name. In this Resource Group, deploy a general purpose v2 Storage Account. Enable the Static Website functionality of the Storage Account. This creates a container, $web, as the root of the web site. You can also specify the site index document and a document to serve as the error (404) page.
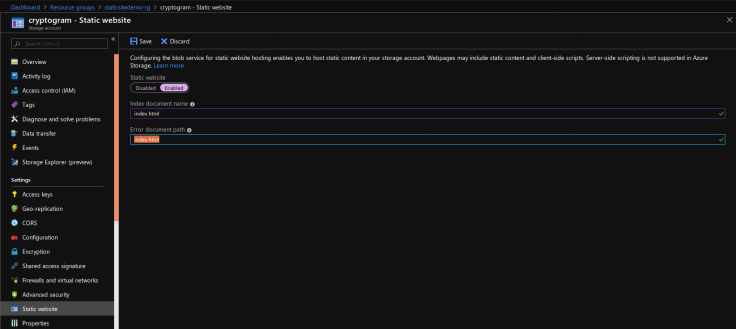
A quick note on security: By default, Azure Storage Account blob storage containers are set to Private – meaning that only authenticated users have access to the storage content. You’ll see that the $web container’s access level is set to Private. How will anonymous web users access your page? The answer is a bit of Azure magic, explained in more detail here. The static web page uses a specific URL in the form of:
https://cryptogram.z20.web.core.windows.net/index.html
Normally, blobs are accessed via the blob URI endpoint which is in the form of:
https://cryptogram.blob.core.windows.net/$web/index.html
The static web endpoint is always public, regardless of the blob container access level setting. The blob container access level setting manages access to the container when the blob service endpoint is used (the second link above). So if you set your blob container access level to public, Internet clients could access your blob contents directly using the second link above, in addition to the static web link.
I recommend leaving the blob access level to Private and using the static web link for serving web content.
Upload Content and Test
Upload some content to the $web container of your storage account. Ensure a file matches the Index page that you set in the Static Website configuration. The Error page is optional – I set it to the same file as my Index to redirect all 404s to the Index page. My example consisted of a single page so this made sense. You can create a folder structure and use relative links same as other web servers.

Test your page by browsing to the Primary Endpoint specified in the Static Website configuration.
You can access your site via HTTPS (and HTTP if you set the ‘secure transfer only’ option to false). Your HTTPS site will automatically have a certificate issued by a Microsoft CA.
Congratulations! You’re now serving a basic web site from Azure PaaS storage. But there’s more you can do! Use the next section to move your site to a custom domain.
Add a Custom Domain
You love your new site, but let’s face it – the domain doesn’t scream “check out my awesome custom site!”. Let’s modify the site to use our own domain.
Before proceeding let’s cover some caveats and think about what you want for your final product. Azure Storage Accounts do not support HTTPS with custom domains at the time of this publishing. However, you can still use your static website and get HTTPS with a custom domain by incorporating the Azure Content Delivery Network (CDN). So it’s time to make a decision:
- If you’re happy with HTTP only on your site and just need a custom domain, read this section (also read this section you want to learn about custom domains with Storage accounts)
- If you need HTTPS on your site with a custom domain, skip this section and go to the next section, Add HTTPS to your Custom Domain
There is one additional prerequisite for this section: You must own the custom domain that you wish to use, and be able to modify DNS records for the domain. My example will feature a domain I own: trustworthybits.com. Substitute your own domain name if following along.
Adding the custom domain to your storage account simply requires creating a CNAME record for the domain you wish to use. The CNAME will be the static web endpoint for your storage account. The following shows the CNAME mapping for my example:
cryptogram.trustworthybits.com CNAME cryptogram.z20.web.core.windows.net
You’ll make the DNS change at your registrar’s site or wherever you are managing DNS for the domain. You must add the DNS record before configuring the custom domain on the Storage Account, because Azure will verify the record before applying changes. Azure will notify that it may take a few seconds for the custom domain to take effect. This allows the back end to prepare to accept the new host name and DNS propagation to occur.
Test your new site by visiting the custom domain. If you try to use HTTPS you can access the site, but you’ll need to accept the risk of the certificate not matching the name you used. Notice that Azure uses a wildcard certificate for the *.web.core.windows.net domain. Using a custom certificate on the storage account currently isn’t supported, hence the reason I noted you “can’t” use HTTPS with a custom domain unless you use the CDN. (You technically can, but the certificate won’t match the domain.)
Add HTTPS to your Custom Domain
In the final step we’ll go all-out. Let’s decorate that static web site with a custom domain and matching certificate. Nothing says professional like your very own site with an honest-to-goodness certificate, right?
In our scenario of using Blob Storage for a static web site, achieving a custom certificate for your custom domain requires use of the Azure CDN. This may sound like a lot of work, but you’ll be surprised at the ease of deployment. Don’t worry too much about cost: the certificate is included as part of the CDN deployment, and for small-scale sites CDN costs aren’t that big.
Any discussion of cost will be subjective. Costs and features also change rapidly in the cloud market. At the time of this posting, transferring about 50GB of data through the CDN (in Zone 1, mainly North America) would cost just above $4. Be sure to research and ask others if you have any questions about cloud costs as you’re responsible for all charges incurred.
Prerequisites for this section:
- You have a working static web site served from Blob Storage per the sections above Create Basic Environment and Upload Content and Test,
- You own and can modify DNS records for a domain
When using the CDN you don’t need a custom domain on your storage account. The CDN takes care of this for you by proxying client connections and relaying traffic to the origin. If you went through the process of adding a custom domain to your storage account, you can remove it now.
Create the CDN Endpoint
If you’re in the Azure Portal there are two ways to deploy the CDN. The traditional method would be through the CDN blade (search All Services for ‘cdn’). Azure also provides a handy link directly in the Storage Account blade under “Blob service” called Azure CDN. The other normal methods, PowerShell, Azure CLI, ARM templates are available as well. Recommendation: Don’t use the link under the Storage Account – create it from the main CDN Profiles blade. We need to point the profile to the static website endpoint of the Storage Account, and it’s easier to set this up from a blank profile.

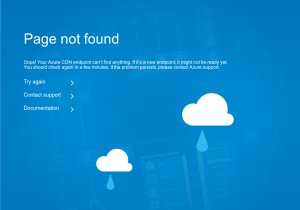
Your first step will be to set up a new CDN profile. Refer to the image as an example. Give it a name and Resource Group as customary for all Azure resources. The Resource Group Location may be fixed as it was in my example. Don’t worry – the CDN is a global service. The pricing tier determines cost to serve data as well as features available for your CDN. I used Standard Microsoft as the cheapest option and I didn’t need any other features for this simple site. Finally, select the check-box to create the CDN endpoint and populate the data as-shown. You’ll want to use the Custom Endpoint and point the origin to the static website endpoint of the storage account (not the blob service endpoint). Click to create and wait a moment for the CDN configuration to propagate to the network. Azure CDN ‘page not found’ error screenshot Patience!
Be patient. It takes a few minutes for the CDN to get set up. In the meantime if you try to visit your site at cryptogram.azureedge.net, you may get a page not found screen. If you’ve set up everything correctly, just be a bit more patient. At this point in deployment, I’ll go make and enjoy an espresso, play with my daughter, or do some other work for a while. After 5-10 minutes you should be able to visit the CDN endpoint at <hostname>.azureedge.net and see your static site. Congratulations – you’re halfway there!
I strongly recommend that you ensure your CDN endpoint is successfully set up before proceeding to the custom domain. You should always perform testing as you go and fix any problems before proceeding. The reason for extra caution at this point is a limitation I ran into while setting up a CDN custom domain for another project. If you decide to “start over” and delete the custom domain while it is validating for the certificate, the system will block re-assignment of the same custom domain for about 8 hours while it clears up background tasks. Feel free to experience for yourself, but you’ve been warned.
Assign Your Custom Domain to the CDN Endpoint
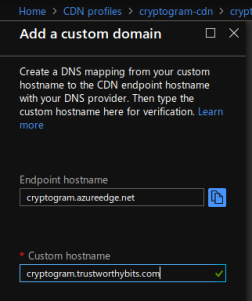
You’ve made it to the final step – assignment of your custom domain. This step is very similar to the process for assigning a custom domain to the Storage Account. You’re creating a DNS CNAME record pointing requests for your custom domain to the CDN endpoint.
Before any Azure configuration you must set up DNS. Create a CNAME record pointing your custom domain to the Azure CDN endpoint name. For my example:
cryptogram.trustworthybits.com CNAME cryptogram.azureedge.net
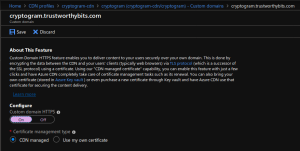
Verify the DNS record is complete before proceeding. The Azure CDN will fail to validate if DNS has not been set up. Note the green check on the custom domain screen shown here. If you get an error indicator (red exclamation mark and note that Azure is unable to resolve a DNS name for the custom domain), verify your DNS settings. If correct, wait a few minutes based on your DNS TTL value to ensure any old value has flushed. I am not sure if this Azure function honors the TTL, but experience shows it may take a minute or two to see the entry.
Once you add the Custom Domain wait for Azure to notify you that application of the configuration is complete, then test your new site via HTTP. The completion notification will indicate it may take up to 10 minutes to update every CDN PoP.
The final step is adding a Custom Domain Certificate to your endpoint for view via HTTPS. Azure offers several options: a CDN-managed certificate (click and go!), or you can manage your own certificate through Azure Key Vault. The latter method allows you to upload your own certificate/key pair, or you can purchase a certificate using Key Vault’s functions. For this demonstration, we’ll use a CDN-managed certificate.
Be prepared to wait. This process can take a while as the CDN verifies the domain and provisions the certificate. Once completed you can visit your website via HTTP or HTTPS, using your custom domain with your very own certificate! I’m curious to know how many support tickets are generated for ‘suspected hung’ validation actions, and how much trouble could be saved by adding the “automatic validation may take 24 hours” note directly to the text in the portal. Seems a small investment for large gain of clarity.
Automatic validation typically takes a few hours. If you don’t see your domain validated in 24 hours, open a support ticket. -Microsoft Docs
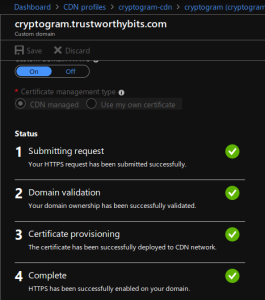
Honestly this part left me frustrated. It took between 24 and 36 hours to complete domain validation. I tweeted @AzureSupport around the 24-hour mark, and they indicated that in rare cases domain validation can take up to 36 hours to complete. Seems a bit long for an automated process, but it’s done now. Be aware of the timing should you deploy on your project.
Review
If you read this far, my hat to you. This post turned out much longer than I planned, and I’ll likely shorten and bulletize future posts of a similar nature. I hope it was beneficial and you learned something about the following concepts:
- Hosting static web content in an Azure Storage Account
- Using Azure CDN to provide custom HTTPS to a static web page in Azure Storage
- Using Custom Domains with Azure Storage and Azure CDN
Drop me a comment on social if this was helpful! Now get out there and post some content!
Woo hoo - Your super-awesome site is ready!